It’s cool cause it has a timer and then it automatically switches to another photo. Aside from that, I also just use google or the stock resources on dA and try to draw as much as possible within a given time period
yo here’s a useful tip from your fellow art ho cynellis… use google sketchup to create a model of the room/building/town you’re trying to draw… then take a screenshot & use it as a reference! It’s simple & fun!
Sketchup is incredibly helpful. I can’t recommend it enough.
There’s a 3D model warehouse where you can download all kinds of stuff so you don’t have to build everything from scratch.
reblog to save a life
This is an incomplete tutorial, and it drives me crazy every
time I see it come around.
We live in a pretty great digital age and we have access to
a ton of amazing tools that artists in past generations couldn’t even dream of,
but a lot of people look at a cool trick and only learn half of the process of
using it.
Here’s the missing part of this tutorial:
How do you populate your backgrounds?
Well, here’s the answer:
If the focus is the environment, you must show a person in relation to
that environment.
The examples above are great because they show how to use the
software itself, but each one just kind of “plops” the character in front of
their finished product with no regard of the person’s relation to their
environment.
How do you fix this?
Well, here’s the simplest solution:
This is a popular trick used by professional storyboard and
comic artists alike when they’re quickly planning compositions. It’s simple and
it requires you to do some planning before you sit down to crank out that
polished, final version of your work, but it will be the difference between a background
and an environment.
Even if your draftsmanship isn’t that great (like mine),
people can be more immersed in the story you tell if you just make it feel like
there is a world that exists completely separate from the one in which they
currently reside – not just making a backdrop the characters stand in front of.
Your creations live in a unique world, and it is as much a character as
any other member of the cast. Make it as believable as they are.
Great comments and tutorials!
I’m a 3d artist and have been exploring the possibilities of using 3d as reference for 2d poses. I want to add a couple of tips and things!
Sketchup is very useful for environment references, and I assume it’s reasonably easy to learn. If you’re interested in going above and beyond, I highly recommend learning a proper 3d modeling program to help with art, especially because you can very easily populate a scene or location with characters!
Using 3ds Max I can pretty quickly construct an environment for reference. But going beyond that, I can also pose a pretty simple ‘CAT’ armature (known in 3d as a rig) straight into the scene, which can be totally customized, from various limbs, tails, wings, whatever, to proportions, and also can be modeled onto and expanded upon (for an example, you could 3d sculpt a head reference for your character and then attach it to the CAT rig, so you have a reference for complex face angles!)
The armature can also be posed incredibly easily. I know programs exist for stuff like this – Manga Studio, Design Doll – but posing characters in these programs is always an exercise in frustration and very fiddly imo. A simple 3d rig is impossibly easy to pose.
By creating an environment and dropping my character rig into it, I have an excellent point of reference when it comes to drawing the scene!
Not only that, but I can also view the scene from whatever angle I could ever want or need, including the character and their pose/position relative to the environment.
We can even quickly and easily expand this scene to include more characters!
Proper 3d modeling software is immensely powerful, and if you wanted to, you could model a complex environment that occurs regularly in your comic or illustration work (say, a castle interior, or an outdoor forest environment) and populate the scene with as many perspective-grounded characters as you need!
A tip for blending when painting digitally: use a transition color! I quickly made this when my brother asked for art advice while I was working on a painting for my best friend. (I was watching a lot of makeup videos to pick out her gifts).
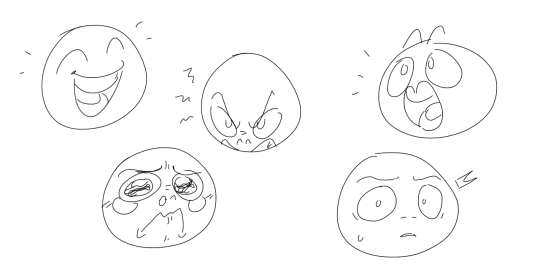
Drawing basic facial expressions is not the hardest. Most people can draw a sad face, a happy face, angry etc., but making more multidimensional expressions is more of a challenge. I have gotten a lot of compliments on how I draw facial expressions, (specifically “angsty ones”) telling me that they are very dramatic and well… expressive! And there are actually only a few things I think about when I draw faces that take them to the next level, so I thought i’d illustrate them all here!
SUPER IMPORTANT TIP BEFORE WE START: Look at your own face when you draw faces. Even making the face when you are drawing (you don’t even have to look at it), will give you some sense of how the face muscles pull and where things fold and stretch, because you can feel it. You are the best reference when it comes to facial expressions!
Angles
Draw the head in an angle that matches the expressions you want to make. It is not a requirement, but is going to add to the effect.
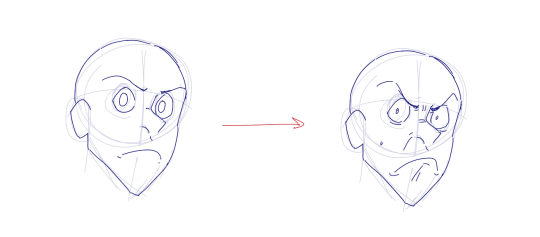
Symmetry vs asymmetry
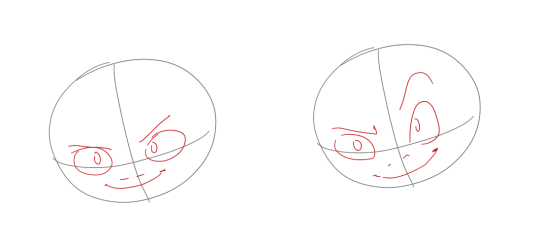
A face is rarely symmetric. Unless the face the character is making is 100 % relaxed or even dissociating, the eyebrows, mouth and facial muscles will have different placements of their respective side. This image shows the dramatic impact asymmetry has on a face:
That’s the difference between a smile and a smirk!
The first one’s like “oh yeah?” and the second is like “oH YEAH??”
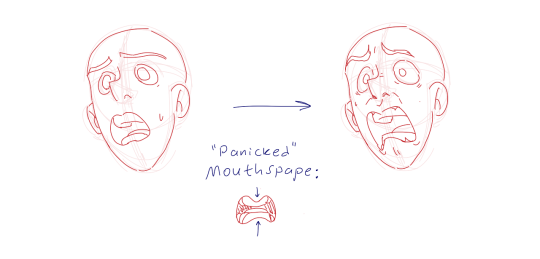
The “balloon squishing principle”
This is something I did subconsciously, and I didn’t know about until I made this tutorial. And this principle goes hand in hand with an asymmetric face. Basically, if you squish one part of the face, you need to even out the empty space by “inflating” the other part of the face so that it doesn’t appear shrunken. The picture hopefully explains it:
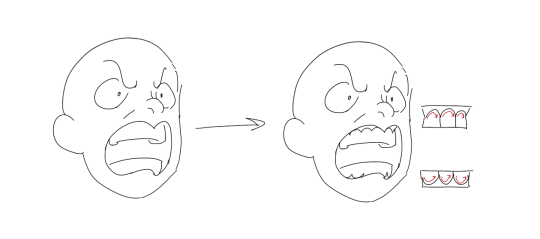
Teeth
Don’t forget to add the gum when the mouth is open to its full potential!
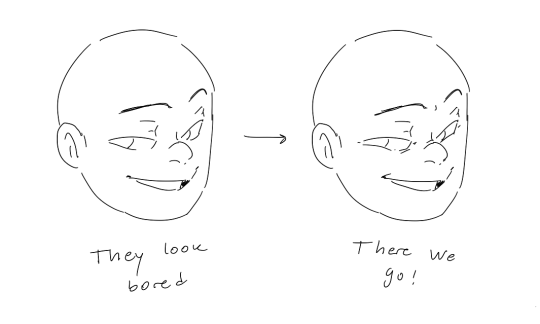
Squinting and folding
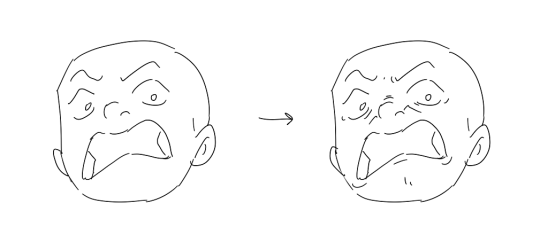
Adding folds around the eyes when a character is squinting makes a HUGE difference. It makes a smile more genuine and a growl more intimidating. Adding folds to the face in general makes your characters more lifelike and ‘visually relatable’. Like, they look human, and less plastic or fake.
and so on..
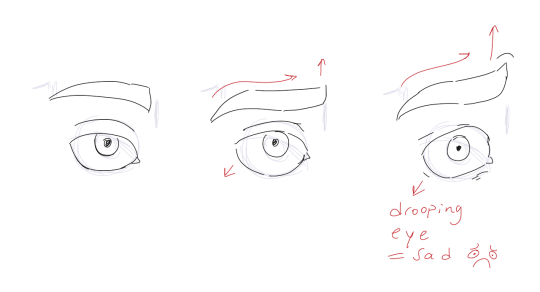
Pupils and irises
The placement of the iris and pupil in relation to the eyelids is very important! The less of the white you see, the more relaxed the character is.
And then of course eyebrows and eyes go hand in hand!
Gestures, spitting, sweating…
Adding more elements than just a face is key to making the character actually look like they are feeling what you want them to feel. Just the tiniest sweat drop adds to their anxiety, spitting adds frustration to their rage, slouching shoulders, waving hands, a double chin, extreme angles, the list goes on! Add whatever and see what kind of impact it makes! Does it do the trick? Great! Add it!
Over exaggeration!!
Remember that you can almost always exaggerate more. Don’t be afraid to do draw “too much” because you’re just experimenting. See what works and what doesn’t. What do you like to exaggerate?
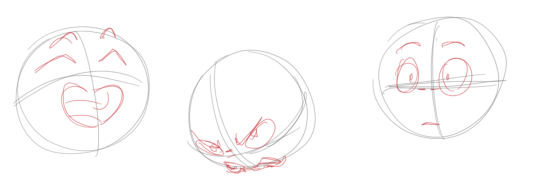
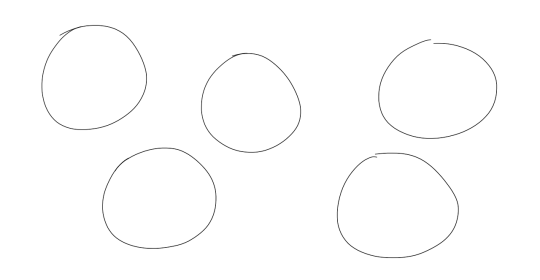
Now that you know some theory, it’s time to practice!
Fill a page with circles and fill them in with different expressions. Try and exaggerate as much as you can!
This is mostly for experimenting. They are quicker to draw than complete faces, but the same rules should apply!
And that’s about it!
I don’t know if I covered everything in this tutorial, since some things might be obvious for me, and this post perhaps only scratches the surface. So feel free to send me a message if you want an explanation about something more in depth! Thank you for reading! And now DRAW!!! ✨🎨